https://blog.naver.com/roboholic84/221022299941
ESP8266 환경설정하기, 기본 예제 알아보기 / NODE MCU / WeMos / ESP8266 / Arducam8266
안녕하세요 메카솔루션입니다. 이번에는 ESP8266을 사용하는 NODE MCU , WeMos 와 같은 보드의...
blog.naver.com
ESP8266을 아두이노 개발환경에서 사용하게 되면 많은 부분이 일반 아두이노를 사용하는 것과 동일합니다.
LED제어나, 센서 라이브러리 사용도 별다른 소스코드의 변경이 없이 사용 가능합니다.
하지만 ESP8266의 와이파이 기능을 사용하는 것은 아직 낯설 것입니다.
이러한 내용을 와이파이 예제를 읽어보면서 분석해 보도록 하겠습니다.
#include <ESP8266WiFi.h>
const char* ssid     = "your-ssid"; // 접속할 와이파이 이름 한글은 안돼요
const char* password = "your-password"; // 접속할 와이파이 비밀번호
const char* host = "google.com";

void setup() {
  Serial.begin(115200);
  delay(10);

  // We start by connecting to a WiFi network
  Serial.println();
  Serial.println();
  Serial.print("Connecting to ");
  Serial.println(ssid);
  WiFi.begin(ssid, password); // 와이파이에 연결하는 함수 입니다.

 // 와이파이에 연결이 될 때 까지 대기
  while (WiFi.status() != WL_CONNECTED) {
    delay(500);
    Serial.print(".");
  }
  Serial.println("");
  Serial.println("WiFi connected");
  Serial.println("IP address: ");
  Serial.println(WiFi.localIP());// 아이피 주소를 출력합니다.
}
void loop() {
  Serial.print("connecting to ");
  Serial.println(host);

  // Use WiFiClient class to create TCP connections
  WiFiClient client;
  const int httpPort = 80;
  if (!client.connect(host, httpPort)) {
    Serial.println("connection failed");
    return;
  }
  String url = "/";// 접속할 사이트 경로 "/"는 최상위 경로이며 "/하위/하위2/하위3/대상파일" 과 같은 구조를 가집니다.
  Serial.print("Requesting URL: ");
  Serial.println(url);

  // This will send the request to the server
  client.print(String("GET ")
               + url
               + " HTTP/1.1\r\n"
               + "Host: "
               + host
               + "\r\n"
               + "Connection: close\r\n\r\n");

  //HTTP 요청을 보냅니다.
  unsigned long timeout = millis();
  while (client.available() == 0) {//5초동안 응답이 없다면 에러처리 합니다.
    if (millis() - timeout > 5000) {
      Serial.println(">>> Client Timeout !");
      client.stop();
      return;
    }
  }

  // Read all the lines of the reply from server and print them to Serial
  while(client.available()){//서버로부터 받은 응답을 출력합니다.
    String line = client.readStringUntil('\r');
    Serial.print(line);
  }
  Serial.println();
  Serial.println("closing connection");

}
HTTP 리퀘스트란 무었일까요?
HTTP(HyperText Transfer Protocol, 하이퍼 본문 전송 규약)
인터넷으로 데이터를 주고받을때 사용하는 플로토콜의 일종입니다.
웹브라우저를 통해 주고받는 정보들이 HTTP통신을 기반으로 구성됩니다.
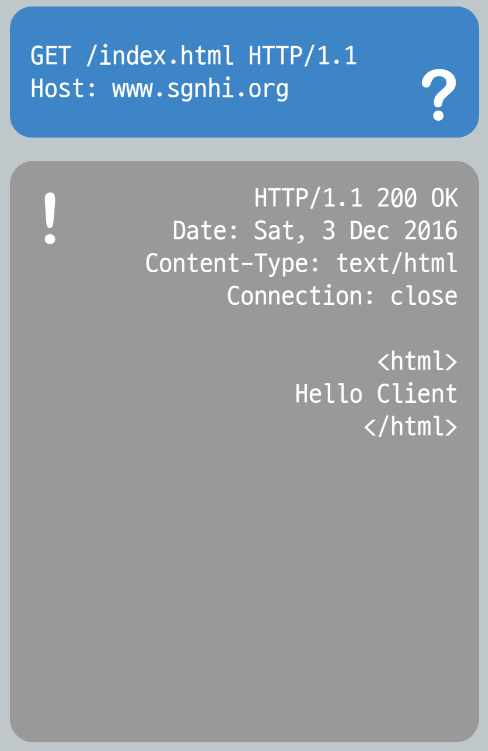
위 그림 과 같이
클라이언트가(ESP8266) 대상 서버에 요청을 하면
서버쪽에서 응답을 하는 방식입니다.
위 소스코드에서의 HTTP Requests 는 다음과 같습니다.
GET / HTTP/1.1
Host : www.shnhi.org
Connection : close
여기서 GET 은 요청 방식으로
POST , HEAD , PUT.... 등의 다양한 형식이 있습니다.
HTTP/1.1 과 GET 사이의 "/' 는 경로인데 이는 최상위 경로를 나타냅니다.
Host 나 Connection은 HTTP헤더로 서버가 받아보는 기본 데이터가 담겨 있습니다.
이것이 전부가 아니라 좀더 다양한 형식이 있을 수 있습니다.
그렇다면 이렇게 리퀘스트를 주었을때 응답은 어떻게 돌아올지 한번 확인해 보도록 합시다.
HTTP/1.1 302 Found
Cache-Control: private
Content-Type: text/html; charset=UTF-8
Referrer-Policy: no-referrer
Location: http://www.google.co.kr/?gfe_rd=cr&ei=gSU1WY2NCK_EXqTWtJAH
Content-Length: 259
Date: Mon, 05 Jun 2017 09:33:53 GMT
Connection: close
<HTML><HEAD><meta http-equiv="content-type" content="text/html;charset=utf-8">
<TITLE>302 Moved</TITLE></HEAD><BODY>
<H1>302 Moved</H1>
The document has moved
<A HREF="http://www.google.co.kr/?gfe_rd=cr&ei=gSU1WY2NCK_EXqTWtJAH">here</A>.
</BODY></HTML>제가 테스트 해보니 위와같은 응답이 돌아왔습니다.
읽어보자면
HTTP/1.1 302 Found
302나 200 과 같은 숫자들은
HTTP응답 또는 스테이터스로 불리우며
HTTP 요청에 대한 결과를 설명해줍니다.
접속에 올바르게 성공하면 200 OK 가 출력되며
올바르지 않을 경우, 300 Found 가 출력이 되거나 경우에 따라 다른 숫자가 출력됩니다.
그리고 나머지는 기타 헤더에 대한 정보이며
마지막으로 <HTML> 부터 서버가 사용자에게 보이고자 하는 데이터들이 적히게 됩니다.
대표적인 예로 날씨정보를 받아오는 사물인터넷 프로젝트에서는
위와같으니 HTTP 데이터를 요청하고 읽어들여 원하는 데이터를 얻어냅니다.
==========================================================================================
GitHub - godstale/ESP8266_Arduino_IDE_Example: ESP8266 Arduino IDE Example
ESP8266 Arduino IDE Example. Contribute to godstale/ESP8266_Arduino_IDE_Example development by creating an account on GitHub.
github.com
#include <ESP8266WiFi.h>

const char *ssid = "your_ssid";
const char *password = "your_pass";

const char* host = "hardcopyworld.com";

void setup() {
  Serial.begin(115200);
  delay(10);

  // We start by connecting to a WiFi network

  Serial.println();
  Serial.println();
  Serial.print("Connecting to ");
  Serial.println(ssid);

  WiFi.begin(ssid, password);

  while (WiFi.status() != WL_CONNECTED) {
    delay(500);
    Serial.print(".");
  }

  Serial.println("");
  Serial.println("WiFi connected");
  Serial.println("IP address: ");
  Serial.println(WiFi.localIP());
}

int value = 0;

void loop() {
  delay(5000);
  ++value;

  Serial.print("connecting to ");
  Serial.println(host);

  // Use WiFiClient class to create TCP connections
  WiFiClient client;
  const int httpPort = 80;
  if (!client.connect(host, httpPort)) {
    Serial.println("connection failed");
    return;
  }

  // We now create a URI for the request
  String url = "/";
//  url += streamId;
//  url += "?private_key=";
//  url += privateKey;
//  url += "&value=";
//  url += value;

  Serial.print("Requesting URL: ");
  Serial.println(url);

  // This will send the request to the server
  client.print(String("GET ") + url + " HTTP/1.1\r\n" +
               "Host: " + host + "\r\n" +
               "Connection: close\r\n\r\n");
  int timeout = millis() + 5000;
  while (client.available() == 0) {
    if (timeout - millis() < 0) {
      Serial.println(">>> Client Timeout !");
      client.stop();
      return;
    }
  }

  // Read all the lines of the reply from server and print them to Serial
  while(client.available()){
    String line = client.readStringUntil('\r');
    Serial.print(line);
  }

  Serial.println();
  Serial.println("closing connection");
}
댓글