https://www.tektutorialshub.com/angular/angular-create-first-application/
In this guide, we will show you How to Create a new project in Angular.
We use Angular CLI to help us to create the app.
The Angular has come a long way since its first version in Angular 2.
The creation of a new project is now as simple
as installing Angular CLI and running the ng new command.
Table of Contents
- What is Angular CLI
- How to Create a new Angular project
- Angular project Folder structure
- app folder
- Other files & folders
- Summary
1. What is Angular CLI
The Angular CLI helps us to quickly create an Angular application with all the configuration files and packages in one single command. It also helps us to add features (components, directives, services, etc) to existing Angular applications.
The Angular CLI creates the Angular Application and uses Typescript, Webpack ( for Module bundling), Karma ( for unit testing), Protractor ( for an end to end testing).
Recommended Read: The Angular CLI Tutorial
2. How to Create a new Angular project
Before starting with Angular, you need to set up your developer environment and install the required tools. Before going further install the following
- Visual Studio Code (or any other editor of your choice)
- NPM Package Manager
You can read the instruction on how to install from the tutorial Installing and Setting Up an Angular Development Environment
Installing Angular CLI
The first step is to install the Angular CLI. We use the npm install command.
|
1
2
3
|
npm install -g @angular/cli@latest
|
The above command installs the latest version of Angular CLI in your machine. Note that we have used the -g flag, (which stands for global) installs the Angular CLI system-wide so that you can use it in your all projects.
Finding the Angular CLI Version
You can find out the Current Installed Angular CLI Version by Using the Command.
|
1
2
3
|
ng --version
|
The latest version as of writing this article is 8.3.19. The command above also gives the version of the node installed in your system. You can keep track of the latest Angular CLI release from this link
You can also read about it from how to check Angular CLI Version
Creating a new Angular Application
The creation of your First Project Angular has become very simple using Angular CLI. All you need to run the command from the Prompt
|
1
2
3
|
ng new GettingStarted
|
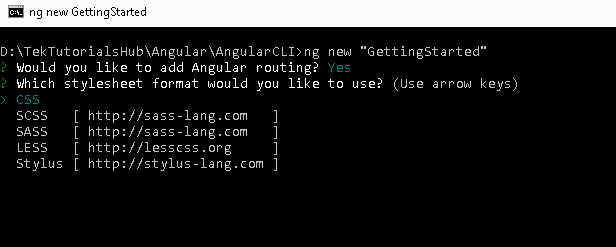
The above command will create a folder GettingStarted and copies all the required dependencies and configuration settings. The Angular CLI does the following
- Creates a new directory GettingStarted is created
- Sets up the folder structure for the application
- Downloads and installs Angular libraries and any other dependencies
- Installs and configures TypeScript
- Installs and configures Karma & Protractor for testing

BEST ANGULAR BOOKS
The Top 8 Best Angular Books, which helps you to get started with Angular
Running your new Angular Project
To run your application all you need to do is type the following command
|
1
2
3
|
ng serve
|
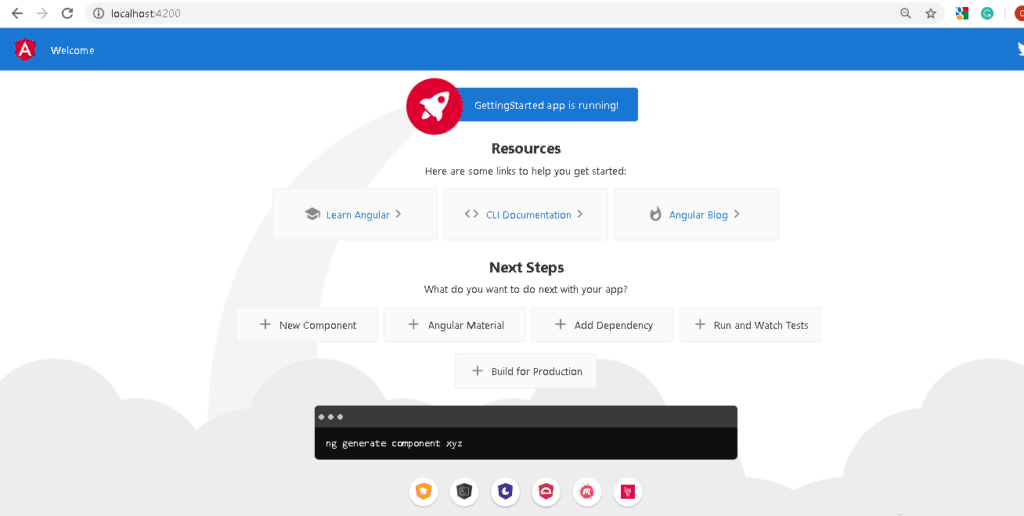
The above command compiles the Angular application and invokes the Webpack development server. The server keeps a watch on our project folder. If you make any changes in the code, it compiles the project again.
You can also use npm start.
The Webpack Development server listens on HTTP Port 4200. Hence open the browser and type http://localhost:4200/ and you will see GettingStarted app is running displayed on the browser.
3. Angular project Folder structure
Open the GettingStarted Folder from Visual Studio Code and you will see the following folder structure
|
1
2
3
4
5
6
7
8
9
10
11
12
13
14
15
16
17
18
19
20
21
22
23
24
25
26
27
28
29
30
31
32
33
34
35
36
37
38
39
40
|
├── e2e
│ ├── src
│ │ ├── app.e2e-spec.ts
│ │ ├── app.po.ts
│ ├── protractor.conf.js
│ ├── tsconfig.e2e.json
├── node_modules
├── src
│ ├── app
│ │ ├── app-routing.module.ts
│ │ ├── app.component.css
│ │ ├── app.component.html
│ │ ├── app.component.spec.ts
│ │ ├── app.component.ts
│ │ ├── app.module.ts
│ ├── assets
│ │ ├── .gitkeep
│ ├── environments
│ │ ├── environment.prod.ts
│ │ ├── environment.ts
│ ├── favicon.ico
│ ├── index.html
│ ├── main.ts
│ ├── polyfills.ts
│ ├── styles.css
│ ├── test.ts
├── .editorconfig
├── .gitignore
├── angular.json
│── browserslist
├── karma.conf.js
├── package-lock.json
├── package.json
├── README.md
├── tsconfig.app.json
├── tsconfig.json
├── tsconfig.spec.json
└── tslint.json
|
The root folder application contains subfolders e2e, node_modules and src. It also contains the few configuration files
.editorconfig: This is the configuration file for the Visual Studio code editor. You can visit http://editorconfig.org for more information.
.gitignore: Git configuration to make sure autogenerated files are not committed to source control.
angular.json: This is the configuration file for Angular CLI. The older versions of the Angular used the file angular-cli.json
browserslist: Ensures the compatibility of the Angular app with different browsers.
karma.conf.js: The Configuration file for the karma test runner.
package.json: The package.json is an npm configuration file, that lists the third-party packages that your project depends on. We also have package-lock.json
README.md: The Read me file
tsconfig.json, tsconfig.app.json & tsconfig.spec.json are Typescript configuration files. The tsconfig.json is the Typescript compiler configuration file. This file specifies the compiler options required for the Typescript to compile (transpile) the project. The tsconfig.app.json is used for compiling the code, while tsconfig.spec.json for compiling the tests
tslint.json: tslint is a static code analysis tool. We use this to check Typescript code quality. To check if TypeScript source code complies with coding rules. TSLint checks your TypeScript code for readability, maintainability, and functionality errors
e2e
This folder contains the files required for end to end tests by protractor. Protractor allows us to test our application against a real browser. You can learn more about protractor from this link
node_modules
All our external dependencies are downloaded and copied here by NPM Package Manager.
src
This where our application lives.
4. app folder
The Angular CLI has created a simple application, which works out of the box. It creates the root component, a root module, a unit test class to test the component. Now let us see each component of the application one at a time
The src folder is where our application lives.
The Component
The app.component.ts is the component that is added to the project by Angular CLI. You will find it under the folder app/src
|
1
2
3
4
5
6
7
8
9
10
11
12
13
|
import { Component } from '@angular/core';
@Component({
selector: 'app-root',
templateUrl: './app.component.html',
styleUrls: ['./app.component.css']
})
export class AppComponent {
title = 'GettingStarted';
}
|
The component class is the most important part of our application. It represents the view of the application. A view is a region on the screen. It consists of three main parts i.e. a class, a class decorator, and an import statement
Import statement
|
1
2
3
|
import { Component } from '@angular/core';
|
The import statement is used to import the libraries that are used in our component class. This statement is similar to C# using statement. Our Component is decorated with the @Component decorator, which is part of the @angular/core module. Hence we need to refer it in our class. This is done using the import method as shown above.
Component class
|
1
2
3
4
5
|
export class AppComponent {
title = 'GettingStarted';
}
|
The component is a simple class. We define it using the export keyword. The other parts of the app can import it use it. The above component class has one property title. This title is displayed, when the application is run.
The component class can have many methods and properties. The main purpose of the component is to supply logic to our view.
@Component decorator
The AppComponent class is then, decorated with @Component decorator. The @Component (called class decorator) provides Metadata about our component. The Angular uses this Metadata to create the view
|
1
2
3
4
5
6
7
|
@Component({
selector: 'app-root',
templateUrl: './app.component.html',
styleUrls: ['./app.component.css']
})
|
The @component Metadata above has three fields. The selector, templateURL & styleUrls
templateUrl
The templateUrl contains the path to the HTML template file. The Angular uses this HTML file to render the view. In the above example, it points to the app.component.html file.
styleUrls
The styleUrls is an array of Style Sheets that Angular uses to style our HTML file. In the above example, it points towards to app.component.css style sheet.
Theapp.component.css file is in the same folder as the AppComponent. The file is empty. You can create styles for the component and put it here
selector
The selector tells angular, where to display the template. In the example above selector is app-root. The Angular whenever it encounters the above tag in the HTML file it replaces it with the template (app.component.html)
The app-root selector is used in index.html, which we will see later.
Template
The app.component.html is our template.The templateUrl in the component class above points to this class. In
The app.component.html file is in the same folder as the AppComponent. The code is almost 500 lines of code and almost all of it is standard HTML & CSS
Note that {{title}} is placed inside the h1 tags in line no 344. The double curly braces are the angular way of telling our app to read the title property from the component (AppComponent). We call this data binding (interpolation).
Root Module
Angular organizes the application code as Angular modules. The Modules are closely related blocks of code in functionality. Every application must have at least one module.
The Module, which loads first is the root Module. This Module is our root module.
The root module is called app.module.ts. (under src/app folder). It contains the following code
|
1
2
3
4
5
6
7
8
9
10
11
12
13
14
15
16
17
18
19
20
|
import { BrowserModule } from '@angular/platform-browser';
import { NgModule } from '@angular/core';
import { AppRoutingModule } from './app-routing.module';
import { AppComponent } from './app.component';
@NgModule({
declarations: [
AppComponent
],
imports: [
BrowserModule,
AppRoutingModule
],
providers: [],
bootstrap: [AppComponent]
})
export class AppModule { }
|
The structure of the Angular module is similar to the component class. Like Component, it consists of three parts. A class, class decorator and import statement
Module class
|
1
2
3
|
export class AppModule { }
|
Similar to the component, the Module class is defined with the export keyword. Exporting the class ensures that you can use this module in other modules.
@NgModule class decorator
|
1
2
3
4
5
6
7
8
9
10
11
12
13
|
@NgModule({
declarations: [
AppComponent
],
imports: [
BrowserModule,
AppRoutingModule
],
providers: [],
bootstrap: [AppComponent]
})
|
We used @component decorator to define our component. The Angular Modules require a @ngModule decorator. @ngModue decorator passes the metadata about the module.
The @ngModule Metadata above has four fields. The declarations, imports, providers, & bootstrap
Imports Metadata tells the angular list of other modules used by this module. We are importing BrowserModule and AppRoutingModule.
The BrowserModule is the core angular module, which contains critical services, directives, and pipes, etc.
The AppRoutingModule is defines the application Routes and is mentioned below
Declaration Metadata lists the components, directives & pipes that are part of this module.
Providers are the services that are part of this module, which can be used by other modules.
Bootstrap Metadata identifies the root component of the module. When Angular loads the appModule it looks for bootstrap Metadata and loads all the components listed here. We want our module to load AppComponent , hence we have listed it here.
Import statement
|
1
2
3
4
5
6
7
|
import { BrowserModule } from '@angular/platform-browser';
import { NgModule } from '@angular/core';
import { AppRoutingModule } from './app-routing.module';
import { AppComponent } from './app.component';
|
The import statement is used to import the Angular libraries required by AppModule. like NgModule &BrowserModule. We also need to import AppComponent, as we want to load AppComponent, when we load the AppModule
App Routing Module
|
1
2
3
4
5
6
7
8
9
10
11
12
|
import { NgModule } from '@angular/core';
import { Routes, RouterModule } from '@angular/router';
const routes: Routes = [];
@NgModule({
imports: [RouterModule.forRoot(routes)],
exports: [RouterModule]
})
export class AppRoutingModule { }
|
The AppRoutingModule in the file app-routing.module.ts defines the Routes of the application. These Routes tells Angular how to move from one part of the application to another part or one View to another View.
The Routes defined in the constant const routes: Routes = [];, which is empty
This Module is defined as a separate Module and is imported in AppModule.
Bootstrapping our root module
The app.component.html is the file, which we need to show it the user. It is bound to AppComponent component. We indicated that the AppComponent is to be bootstrapped when AppModule is loaded
Now we need to ask the Angular to load the AppModule when the application is loaded. This is done in main.ts file
The main.ts file is found under the src folder. The code is as follows.
|
1
2
3
4
5
6
7
8
9
10
11
12
13
14
|
import { enableProdMode } from '@angular/core';
import { platformBrowserDynamic } from '@angular/platform-browser-dynamic';
import { AppModule } from './app/app.module';
import { environment } from './environments/environment';
if (environment.production) {
enableProdMode();
}
platformBrowserDynamic().bootstrapModule(AppModule)
.catch(err => console.error(err));
|
The second line of the import is platformBrowserDynamic library. This library contains all the functions required to bootstrap the angular application.
We also import is enableProdMode from @angular/core library. The Angular’s code by default runs in development mode. The development mode runs few assertions and checks, which helps in debugging the application. The enableProdMode enables the production only if the current build Angular environment is production
We also need to import our AppModule.
The last import is the environment, which is in the folder src/environments. The file environment.ts contains the contents for the current environment. The development environment uses the environment.ts file. When you build the project for the production environment, then the environment.prod.ts will be used. The environment are configured in angular.json`
In the next line, our code checks the environmental variable and enable the production mode, if the environment is production.
|
1
2
3
4
5
|
if (environment.production) {
enableProdMode();
}
|
Finally, the bootstrapModule method of platformBrowserDynamic library to bootstrap our AppModule
|
1
2
3
4
|
platformBrowserDynamic().bootstrapModule(AppModule)
.catch(err => console.error(err));
|
index.html
Index.html is the entry point of our application.
|
1
2
3
4
5
6
7
8
9
10
11
12
13
14
15
|
<!doctype html>
<html lang="en">
<head>
<meta charset="utf-8">
<title>GettingStarted</title>
<base href="/">
<meta name="viewport" content="width=device-width, initial-scale=1">
<link rel="icon" type="image/x-icon" href="favicon.ico">
</head>
<body>
<app-root></app-root>
</body>
</html>
|
The selector app-root, which we defined in our component metadata is used as an HTML tag. The Angular scans the HTML page and when it finds the tag <app-root><app-root> replaces the entire content with content of app.component.html
5. Other files & folders
We have a few other files under the app folder.
Assets
A folder where you can put images and anything else to be copied wholesale when you build your application.
Environments
The environment folder is where we define environment variables for various build setups. The build setups can be development, production, testing & staging. The Angular has creates two build environments out of the box. One is development, which is the default and the other one in Production. The two files environment.ts is the default for development and the environment.prod.ts is for the production build.
polyfills.ts
Different browsers have different levels of support of the web standards. Polyfills help normalize those differences. You can read more about browser support guide about the browsers supported by Angular
styles.css
Your Angular global styles go here. Most of the time you’ll want to have local styles in your components for easier maintenance, but styles that affect all of your apps need to be in a central place.
test.ts
This is the main entry point for your unit tests. It has some custom configuration that might be unfamiliar, but it’s not something you’ll need to edit.
6. Summary
To create a new project in Angular, we must install angular/cli first. We use ng new <name> to create new project. The Angular CLI does an excellent job of downloading all the required libraries and configuring the app. We use ng serve to run our application, which starts the Webpack development server at port 4200. In the subsequent tutorials, we learn more about Angular
You can download the source code from here
'Angular JS' 카테고리의 다른 글
| Angular Components Overview & Examples (0) | 2022.01.15 |
|---|---|
| Bootstrapping in Angular: How It Works Internally (0) | 2022.01.15 |
| How to Install Angular and Set Up Development Environment (0) | 2022.01.15 |
| Angular Architecture Overview & Concepts (0) | 2022.01.14 |
| Introduction to Angular (0) | 2022.01.14 |

댓글